Selain daripada "tubular" metal frame yang ada pada lambretta LI siri yang kedua (pergh bahasa melayu memang mengkagumkan!) terdapat juga "body parts" yang melengkapkan badan lambretta tersebut, apa yang unik bagi lambretta LI siri yang kedua adalah bentuknya yang lebih bulat dan merupakan lambretta yang terakhir dibuat dalam bentuk bulat, maka semua LI siri yang kedua merupakan pengeluaran lambretta berbentuk bulat terakhir termasuklah jenis biasa iaitu LI150 dan juga TV175. Gambar ini diambil daripada internet bagi mengingatkan betapa banyaknya body parts lambretta LI siri yang kedua agar tidak lupa nanti atau hilang di kemudian hari. (p.s thanks to whoever own this picture, it helps me a lot!)
Monday, November 16, 2009
Lambretta LI2 Body Parts
Selain daripada "tubular" metal frame yang ada pada lambretta LI siri yang kedua (pergh bahasa melayu memang mengkagumkan!) terdapat juga "body parts" yang melengkapkan badan lambretta tersebut, apa yang unik bagi lambretta LI siri yang kedua adalah bentuknya yang lebih bulat dan merupakan lambretta yang terakhir dibuat dalam bentuk bulat, maka semua LI siri yang kedua merupakan pengeluaran lambretta berbentuk bulat terakhir termasuklah jenis biasa iaitu LI150 dan juga TV175. Gambar ini diambil daripada internet bagi mengingatkan betapa banyaknya body parts lambretta LI siri yang kedua agar tidak lupa nanti atau hilang di kemudian hari. (p.s thanks to whoever own this picture, it helps me a lot!)
Sunday, November 15, 2009
Bearing- Where To Get It
 Bearing plays a major role in any engine whether the engine belong to the vehicle or machine, in lambretta engine several sizes of bearing can be found and these bearings can be divided into two kinds, first is the normal bearing and the second is needle bearing, although bearings can be found in several shops in KL, but most of the time, some shop they don't sell particular bearing with particular size. I normally look for bearings either somewhere around Sg. Besi or Loke Yew and these is a place for you to find specialist shop for bearing like SKF and NTN.
 Among the brand that you can choose for your bearing is NTN, SKF and NACHI. The bearing is located in several parts in lambretta engine like rear hub bearing, flywheel bearing, casing cover bearing, drive side bearing and many more, at RAG we always try to find the best, if we can't find the best, then we will go for the second best. Life is always about seeking for the best.
this picture shows the engine part before being reassemble at RAG.
Friday, November 13, 2009
Mengilatkan Engine Casing Cover.

Thursday, November 12, 2009
RAG Bergegar Kembali
 After being quite some time, or shall i say dormant. RAG is operating again with a new spirit, adding to this spirit is an eagerness of RAG member to complete the restoration of their scooters as soon as possible before the Kuala Kangsar Scooter Festival that is going to be held in April next year. Another thing that has really influence us to "get our hand oily" again is the beauty of Pa'din SX 150 that has already being the major reference to our scooter restoration.
 Gambar diatas menunjukkan Chief Mechanic RAG sedang membuat allignment body SX150 beliau sebelum dihantar untuk dicat. RAG yang kini mempunyai "Support Frame" untuk menyokong frame lambretta agar mudah apabila kerja dilakukan untuk membuat allignment dan sebagainya.
Monday, March 23, 2009
It's Been A Long Time

It’s been a long time! Dah lama betul rasanya tak update blog ni, sampai kawan-kawan telefon ingatkan yang blog ni dah mati. Sebenarnya aku memang dah lama tak dapat peluang untuk menghadap computer lama-lama macam ni, banyak sangat halnya sampai banyak kerja yang dah terbengkalai. Especially untuk update blog!. Hari ni aku nak ceritakan berkenaan progress lambretta aku yang selama ni juga terbengkalai. Di RAG, kebanyakan lambretta yang dalam proses restorasi memerlukan lebih ruang untuk proses tersebut, maka akhirnya ahli-ahli RAG telah bersetuju untuk membuat restorasi kepada lambretta mereka di halaman RAG, and we might want to call it “Halaman Innocenti” oh what a name! Pa’din, sebagai master welder di RAG kelihatan dalam gambar sedang membina frame untuk meletakkan body lambretta. Wan Kechik sedang membuat proses “Paint Stripping” untuk casing enjin lambrettanya, Mat DH pula sedang mengeluarkan magnet dan coil daripada casing enjin lambretta aku manakala Pesa pula sedang memasang racing chain tensioner kepada LI3 nya.
Wednesday, January 28, 2009
Sandblasting Process.
 Proses sandblasting merupakan antara proses terpenting dalam restorasi kenderaan-kenderaan lama, ini kerana dengan menjalankan proses sandblasting, permukaan besi akan bebas daripada cat lama, simen dan karat yang boleh menyebabkan proses mewarna semula permukaan besi tersebut menjadi sukar. Berikut adalah sedikit maklumat berkenaan sandblasting yang aku jumpa dalam wikipedia :-
Sandblasting or bead blasting is a generic term for the process of smoothing, shaping and cleaning a hard surface by forcing solid particles across that surface at high speeds; the effect is similar to that of using sandpaper, but provides a more even finish with no problems at corners or crannies. Sandblasting can occur naturally, usually as a result of particles blown by wind causing eolian erosion, or artificially, using compressed air. An artificial sandblasting process was patented by Benjamin Chew Tilghman on October 18, 1870.
Historically, the material used for artificial sandblasting was sand that had been sieved to a uniform size. The silica dust produced in the sandblasting process caused silicosis after sustained inhalation of dust. Several countries and territories now regulate sandblasting such that it may only be performed in a controlled environment using ventilation, protective clothing and breathing air supply.
Historically, the material used for artificial sandblasting was sand that had been sieved to a uniform size. The silica dust produced in the sandblasting process caused silicosis after sustained inhalation of dust. Several countries and territories now regulate sandblasting such that it may only be performed in a controlled environment using ventilation, protective clothing and breathing air supply.
Maka kalau mengikut penerangan diatas, proses sandblasting ini sebenarnya bermula secara natural sebelum proses sandblasting ciptaan manusia diadakan dan kemudian apabila manusia mendapat idea untuk meniru sandblasting dari alam semulajadi maka terciptalah proses ini pada tahun 1870.
 Disebabkan kekangan kewangan aku hanya mampu untuk menghantar beberapa bahagian (yang difikirkan penting) untuk dihantar menjalani proses sandblasting ini, bahagian-bahagian tersebut adalah
a. Frame / Rangka Badan
b. Mudguard Depan dan Belakang
c. Fork
Proses tersebut mengambil masa lebih daripada 24 jam untuk dibuat dan hasilnya boleh dilihat seperti dalam gambar.
Sunday, January 18, 2009
Premier Support- Tun Razak And The Lambretta Factory

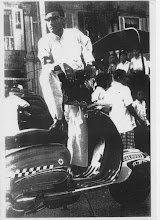
Tun Abdul Razak B Hussain is our second prime minister, he was known as the father of development in Malaya (the old name of Malaysia) at that time. With his leadership he has brought Malaya towards a better country and his dream is to see Malaya at par with other country that has achieved their independence from the British. This is the picture of him riding a lambretta motorscooter when he officiated the opening of lambretta assembling plant in Johor. In this picture Tun Razak was riding Lambretta Special X 150 model, a model that is very rare and hard to find nowadays. I keep on wondering if the lambretta he rode in that picture is still exist and running until today. We in Malaysia should pay our tribute to this great machine as what Tun Razak did at his time previously.
Thursday, January 15, 2009
Skelly Anyone?

Our body is consisting of Bone and Flesh. The bones support the body and all the organs while the flesh cover the bone and protect it. Skeleton (some people call it skelly) is the term use for the strong framework consist of bone that support the body, therefore if we talk about skelly scooters, it refers to scooters that has been strip off to its minimal and the only thing left is the frame and engine. The question is, what so special about skelly scooters? This is what I found in wikipedia:-
“A cutdown (sometimes known as a skelly) is a customised scooter (usually an Italian Vespa or Lambretta) with parts of the bodywork removed or cut away. Cutdowns were popular amongst skinheads and scooterboys during the mod revival of the 1970s and 1980s. While the style-obsessed British mod youth subculture of the 1960s prized the glamorous, metropolitan image of scooters, many skinheads and scooterboys viewed their bikes as simply a form of transportation.[1][2]
While some scooter enthusiasts have focused on the stripped-down look, with just a bare frame and visible motor and mechanical parts, some scooterboys put back almost as much hardware as they had taken off, by adding customized chrome-plated accessories and racks.” - WIKIPEDIA
The picture above portraying the next step of my Lambretta LI Series 2 restoration process, I’m not going to turn it to skelly scooters but to strip it off so that I can send it to the next process which is the sandblasting process. Many of us are aware that lambretta frame is made of tubular metal and this make lambretta had more parts comparing to Vespa. I found out that the previous owner of this lambretta has weld the double stand of this lambretta and this has make it very difficult to strip it off from the body frame and I have to grind the welded parts to separate them.
Also in the picture is two most prominent figures of RAG, Mr. Pesa and Mr. Pa’din studying the process of striping off the scooters from the book “Spanners Workshop Manual For Lambretta Slimstyle Scooters” wrote by Martin Sticky Round.
Monday, January 12, 2009
Lambretta In The 60's Malay Film
 The Roman Holiday has been a remembered film due to the appearance of Vespa especially in a several scene in that movie. The strategy of having Gregory Peck and Audrey Hepburn to ride Vespa in that film to portray the vehicle that has been used as a daily ride of the Italian in the city of Rome is really a romantic one. But far in the east, the Malay Film also applies this strategy to pull people to watch the Malay film and also to ride on the popularity of scooters as a mode of transport in that era. The film “Che Mamat Parang Tumpul” is the first film I guess, to use lambretta as a prop that reflect the durability, elegance and style. With the happy go lucky personality of “mamat” acted by Wahid Satay the reporter cum private investigator that has been given a task to investigate a triad group of “Kumpulan Tangan Hitam”, he ride lambretta in that film to move around to fulfill his task and later to destroy the sinful business of that triad group. As a fan of lambretta I really mesmerize watching this film as the song sung by Wahid Satay as a tribute to Lambretta LI series 1 make me want to sing along. You can watch this video when you click this adress http://www.youtube.com/watch?v=PK-Xg0shrf8
Wahid Satay make another appearence with Lambretta in the film "Dua Kali Lima". In this film Wahid Satay rode white Lambretta LI Series 2 with Siti Tanjung Perak, what make me laugh is that in this film you can see a camera trick where the lambretta scooter flip over 360 degrees at the end of the song sing by Siti Tanjung Perak. You can always view this video here http://www.youtube.com/watch?v=sex21GPT5Oo
Another film that also featured Lambretta as a prop is “Muda Mudi”, but the appearance of Lambretta in this film is not as prominent as the appearance of Lambretta in “Che Mamat Parang Tumpul”. In one of the scene in this film where a group of agogo band is playing their song by the sea side, several of their fans sitting on their lambrettas LI series 3 watching the band performs.
Vespa gain more popularity than lambretta later in the end of 60's and malay film featured more vespa than lambretta after the 60's era.
Sunday, January 11, 2009
Ready To Be Cleaned!

The dismantling process of my lambretta engine is what I can say as not an easy task, due to a rusted part and parts that is stuck together for quit a long time has contributed to the level of difficulties in dismantling all the engine parts. I don’t have any experience in dismantling either lambretta or vespa engine before and as far as I’m concerned the only two wheels vehicle that I’ve ever dismantle all the body parts is my bicycle when I was small! Therefore, being able to learn this process is a very good knowledge for my future undertakings (well, at least to fix it up again if nobody is around me!) The lambretta engine parts is actually covered by the engine casing which look like butterfly cocoon, inside the casing you will find the clutch plate, tranmission gears, drive chain and all sorts of small things that i cant even remember the names. Suprisingly according to Mat DH, my piston and con rod is still in good condition and i dont have to replace them, however, the kick starter shaft of my engine has been weld to the casing and this make us unable to take off the starter pedal.
After all the parts inside the engine casing has been take out and arranged in one place, i bring the engine to Maju Jaya Motor in Sg. Besi in order to replace the rubber mount of the engine. According to Uncle Chai of Maju Jaya Motor, he could not find the originals lambretta rubber mount and replace it with rubber mount that is usually used for cars, he told me that this rubber mount will work better than the original and last longer, in the end i have to pay him RM110 for getting and fixing the rubber mount to my engine (Can't do it myself as the process need to use a special machine). Another thing that Maju Jaya done to my engine is to reweld the kickstarter shaft and replace it with the new one, not original but made in India.
All the parts like trasmission gears, chain, con rod, piston, clutch plate that i've already arranged in one place is cleaned using petrol and special chemical called engine degreaser which you can buy at Hardware Shop. There are several "wear and tear" parts that i have to purchase like needle bearing, clutch plate and not forgetting all the engine bearings which i plan to replace it with the new one as i dont even know when is the last time the previous owner replace all the bearings.
Friday, January 2, 2009
Proses Menurunkan Enjin

Setelah berjaya “dengan tangan sendiri” membuka sebahagian daripada bodyparts lambretta aku, aku dengan bantuan Mat DH telah “mengorak langkah” untuk membuka enjin lambretta yang telah berusia puluhan tahun ini.
Langkah pertama yang telah dilakukan adalah dengan menanggalkan semua sambungan wayar elektrik yang menyambungkan magnet dan junction box yang terletak disebelah kiri badan lambretta. Kemudian setelah semua sambungan dibuka, batang atau shaft yang menyangkutkan enjin dengan rangka lambretta dikeluarkan dengan membuka nut dikedua-dua belah shaft tersebut, namun begitu disebabkan shaft tersebut telah begitu lama tidak dibuka, aku dan Mat menghadapi masalah untuk membukanya, mujur Pesa yang begitu bersemangat dengan tukul besinya mencuba dan mencuba sehingga beliau berjaya mengetuk shaft tersebut keluar daripada alurnya. Setelah shaft tersebut berjaya dikeluarkan dan nut yang terdapat di penyerap hentak belakang dibuka, barulah enjin tersebut dapat “diturunkan” daripada rangka lambretta tersebut.
Setelah enjin lambretta tersebut berjaya “diturunkan”, perkara pertama yang dilakukan adalah membuka tayar belakang yang masih terlekat di hub belakang, setelah tayar belakang tersebut dibuka, hub tersebut perlu dibuka perlahan-lahan dengan mengetuk hub tersebut keluar daripada “casing” enjin tersebut, namun begitu, sekali lagi kami mengalami masalah kerana hub tersebut begitu “degil” untuk dikeluarkan, setelah beberapa hari disembur dengan WD40, barulah hub tersebut berjaya dikeluarkan.
Setelah semua bahagian yang bersambungan dengan bahagian “casing” enjin berjaya diceraikan, barulah casing enjin tersebut dibuka, operasi membuka casing enjin tersebut hanya mengambil masa lebih kurang setengah jam sahaja oleh Mat DH, semua bahagian tersebut kemudian disusun setempat agar mudah untuk dibersihkan. Walaupun mengambil masa yang agak lama untuk membuka enjin ini namun aku betul-betul berpuas hati kerana dapat membuka sendiri enjin tersebut dengan bantuan Mat DH.
Subscribe to:
Posts (Atom)